Summer 2019 was classic and during Summer 2020 the best place to be was on a boat!
Thursday, April 8, 2021

Wednesday, April 1, 2020
Flying Scott as Garage Art?
After the restoration of the Scott I decided I didn't want to put it back in the salt-water so the motor and controls were lovingly put in storage so when it needs to go back on Whisky Tango it will be ready to go.

Sunday, June 30, 2019
Fun Zone Yacht Club
After restoration, the Flying Scott is now perfect and quite frankly, I didn't have the heart to put it back in the saltwater. Given the fact that running the Scott in salt requires semi-annual restoration, and it does pollute the bay a little, and it's kind of loud and smelly, and it doesn't really like going slow... like a crazy person, I took my newly restored Flying Scott off the boat and put it on a motor stand to display as "art" it in my garage.
I decided, to "responsibly" propel the Dorsett on our summer cruising I would order a 30HP Tohatsu 4-stroke. The weight of the Tohatsu was almost identical to the Scott (4-strokes are usually heavier than their 2-stroke cousins). Also, it's my understanding a 60 HP (rated at the powerhead) is about the same power as a 40 HP (rated at the prop) new motor. We had it installed on the boat by the guys at Amber Marine in Costa Mesa, CA.
I could have gone with a bigger motor but we strictly use this boat for harbor cruising and the 30 has plenty of power to get the Dorsett on a plane. I felt the 30 was a good compromise and of-course I rebranded the Tohatsu with a couple of Dorsett stickers and we were off to the beach.

The burgee we are running on the bow of the Dorsett is the official burgee of the FZYC (Fun Zone Yacht Club). The historic Fun Zone sits mid-peninsula in the Newport Harbor and is the home of the original Ferris Wheel and Merry-Go-Round and Bay Arcade in our little beach town.
Would you like to be a member of the FZYC? Everyone is invited, we have very low standards.
 |
| The Dorsett with it's new "salt-power" at the guest dock at "Billy's at the Beach" in Newport Beach, CA Whisky Tango is sitting petty right next to a Van Dutch '55 that can be all yours for $1M. |
I decided, to "responsibly" propel the Dorsett on our summer cruising I would order a 30HP Tohatsu 4-stroke. The weight of the Tohatsu was almost identical to the Scott (4-strokes are usually heavier than their 2-stroke cousins). Also, it's my understanding a 60 HP (rated at the powerhead) is about the same power as a 40 HP (rated at the prop) new motor. We had it installed on the boat by the guys at Amber Marine in Costa Mesa, CA.
I could have gone with a bigger motor but we strictly use this boat for harbor cruising and the 30 has plenty of power to get the Dorsett on a plane. I felt the 30 was a good compromise and of-course I rebranded the Tohatsu with a couple of Dorsett stickers and we were off to the beach.
 |
| The Dorsett at the guest dock at the "View" in Newport Beach, CA |
 |
| The Dorsett at the guest dock at the "Woodies Warf" in Newport Beach, CA |

The burgee we are running on the bow of the Dorsett is the official burgee of the FZYC (Fun Zone Yacht Club). The historic Fun Zone sits mid-peninsula in the Newport Harbor and is the home of the original Ferris Wheel and Merry-Go-Round and Bay Arcade in our little beach town.
Would you like to be a member of the FZYC? Everyone is invited, we have very low standards.
Tuesday, May 21, 2019
Flying Scott Restoration Complete
The chrome (finally) arrived home and it was time to put the Dorsett back together. All the chrome got reinstalled with new stainless hardware and nylon lock-nuts.
With the carbs rebuilt and the chrome reinstalled, everything went back together great and the motor was back on the Dorsett in record time. Since this was the third time I had the motor apart, during reassembly I replaced almost every bolt on the motor with new stainless hardware.
Running the Scott in a bucket, I spent some time trying to adjust the idle down and get the timing just right for Harbor cruising. In Newport we have a 5 MPH max speed and the Flying Scott prefers to go fast! My only problem... now the motor is too nice to put back in saltwater!
 |
| The big upgrade was installing the vintage Wilcox Crittenden Sea Flair burgee pole. This burgee pole was designed to go on a special base for the stock Wilcox Crittenden bow light on our boat. The problem with using the bow light base on a Belmont would put the burgee too close to the windshield. The compromise was to buy a second bow handle and machine a hole with tab slots so the burgee pole could be mounted upfront. |
 |
| Fresh chrome. It took 3 shops and almost 8 months to get the chrome back. Nobody wanted to deal with the little parts and the pot metal. It was worth it. |
With the carbs rebuilt and the chrome reinstalled, everything went back together great and the motor was back on the Dorsett in record time. Since this was the third time I had the motor apart, during reassembly I replaced almost every bolt on the motor with new stainless hardware.
 |
| The cowl chrome side plates were replaced with a set of '59 sides. My '60 sides need to go to the chrome shop for refreshing. All the exterior bolts were replaced with stainless acorn nuts and 'new' rubber for the cowl came from my '59 donor motor that had perfect donor rubber. |
Running the Scott in a bucket, I spent some time trying to adjust the idle down and get the timing just right for Harbor cruising. In Newport we have a 5 MPH max speed and the Flying Scott prefers to go fast! My only problem... now the motor is too nice to put back in saltwater!
 |
| Fresh paint, points, plugs, fuel lines and rebuilt carbs. |
 |
| Ready to roar and run for another summer of fun! |
Saturday, February 2, 2019
Triple Carter Carburetors Rebuild
When we took it out after the summer of 2017 we were dealing with rough idle... so I used the winter downtime to rebuild the carbs with the NOS carburetor rebuild kits I got on eBay and to replace almost every nut and bolt on the motor with stainless hardware.
 |
| Lovell Marine Products NOS rebuild kits for the Carter carbs installed on Flying Scott motors. |
 |
| These are pretty basic and the rebuild is simple. The only odd part is the fuel rod spring and pin. Ideally, I need to have three custom springs wound as I haven't found anything that fits. |
Tuesday, September 11, 2018
Boating? Summer 2018

In May, I was preparing the boat for our Summer season with the intention of rebuilding the carbs doing a basic tune-up with plug and points and changing the gear oil. But as I was lifting the motor I noticed it was tipping to the left side as I lifted. Maybe only 1/4-3/8 but there was a definite tilt. Upon further inspection, I determined the main hinge bolt had rusted through on one side! Based on this discovery, I knew I needed to replace the bolt or risk having to fish the motor out of the bay.
 |
| Not only was the main pivot bolt rusted through at one end but so was one of the two transom clamp lower bolts. Salty. |
 |
| What goes with new paint? New Chrome! See that burgee pole? I cut a slot for it in my extra bow handle. Hopefully, I will be able to fly a FZYC burgee next summer. |
I also thought it was a good idea to pull off all the chrome and send it to the chrome shop. All the chrome was pulled inventoried and delivered to a buddy of mine who is in the motorcycle parts business. They do a lot of chrome and I begged a favor to have him put my chrome in with one of his wheel orders knowing it would knock 75% of the cost out of what otherwise would have been a $3K project. The only caveat... no promises about when it would be done.
 |
| Mike Kuhar painting my motor cowl. Mike's business is refinishing furniture and custom home interiors. Vintage boat motor painting is a hobby. |
Next Step... motor reassembly.
Tuesday, August 8, 2017
Wilcox-Crittenden Sea Flair Burgee Pole
I recently grabbed a bow light base and burgee pole off a Dorsett Catalina on e-bay. A little digging and I've learned the parts are made of pot metal called "Zamack" and are from the 1959 Wilcox-Crittenden Sea Flair line. They are pretty worked and will likely restore poorly because of the pits.

Since my bow light is so close to my windshield I'm thinking of modifying the extra bow handle I have to accept the Wilcox-Crittenden burgee pole.

Sunday, July 30, 2017
Woodies Warf on Date Night

Monday, July 24, 2017


Saturday, July 8, 2017
Glass Windshield from Dorsett Catalina
The Dorsett Belmont has a unique patented feature that allows the boater to tilt the window back and climb out over the bow.

In 1960 the windshields were made of plexiglass and over the years mine had developed scratches and cracks.
I called Eduardo (the seller and another vintage glass lover...) and verified the beam on the windshield was the same as my Belmont's plexiglass windshield so pulled the trigger. My friend Tom was visiting UC Davis in Sacramento for a class at on setting up a wine tasting room and agreed to bring my prize home with him.
The windshield arrived in perfect condition, but it presented a dilemma. The brackets on the glass Dorsett windshield were longer than the brackets on my plexiglass windshield.A normal person would have just drilled new holes for the brackets but since I

In 1960 the windshields were made of plexiglass and over the years mine had developed scratches and cracks.
 |
| The old plexiglass windshield had several cracks and was scratched. |
This winter I finally bought a glass windshield for the Belmont. I was given the sellers number when I bought the boat but $300 seemed like a lot of money to pay for an "accessory" for a non-operational $1200 boat. Five years later the price went up to $500 but somehow based on the amount of fun we've had the price seemed like a bargain.
 |
| In 63 Dorsett started using glass windshields that were held closed with levers where my plexiglass windshield has thumb latches mounted further out. |
The windshield arrived in perfect condition, but it presented a dilemma. The brackets on the glass Dorsett windshield were longer than the brackets on my plexiglass windshield.A normal person would have just drilled new holes for the brackets but since I
- a) didn't want to drill holes in the boat and
- b) I didn't have the mounting brackets for the glass windshield
 |
| The 63 Dorsett windshield has longer brackets that are cast and appear to pivot on a ball. |
 |
| The plexiglass windshield had aluminum brackets that wrap around the glass and pivot on a shoulder screw. I made a cardboard pattern and split the difference to line up with the pivot point. |
 |
| I bought a sheet of .10 aluminum which was a little thicker than the original but could still be bent. Buy some good blades, the aluminum is soft and it gums up the jigsaw teeth. |
 |
| I made the first bend in my vice, the second bend required clamping the piece to my workbench with a 5/8" thick piece of wood and then bending over the wood. The top is the original bracket, the middle my new bracket, then the template and what was left of the cast bracket once I liberated it from the glass windshield. |
 |
| The new bracket on the glass windshield with the original mount location. Stainless 1/4-20 button head screws with stainless acorn nuts hold the windshield bracket in the 3 original hole locations. |
 |
| Two happy campers can see clearly now. |
Saturday, June 24, 2017
Salt Water Gospel (a.k.a. what's frozen/rusted solid this year.)
We run our Dorsett and Scott in salt water and salt loves to have its way with old boat parts. Every year when we put the boat in for the summer something else is inevitably frozen. Two years ago I put the boat in and the steering wheel would not turn. This year the shift cable was frozen.
The Scott controls and cables have unique fittings at each end and the fittings are held in place with nuts that thread onto the cables. Unfortunately, modern Seastar cables that are readily available from West Marine use a trap and bracket to hold the cable in place. To compensate I fabricated brackets from steel angle brackets I bought at Lowes.
At the control end, I needed to space the trap back about an inch so I bolted a couple brackets to the bottom and fed the cables right through the plastic pieces that originally trapped the cable in the housing. In addition to holding the new cables, the bracket allowed me to repair the control housing I broke as I tried to push the frozen control forward. ID10T Error.
At the motor, Scott uses plastic balls. Here I made a custom trap that fits in the cable mount position.
 It's all pretty simple but effective, all four brackets were painted with some left over paint from the motor painting project and the end result is nice new control cables on my classic Scott. Cool eh?
 |
| The original control cables have threaded sleeves that use brass nuts to trap a plastic ball at the motor and plastic square (not pictured) at the control end. The motor/control connectors are threaded onto the cable ends and are the same thread as modern Seastar cables. |
 |
| Steel angle brackets from Lowes were bent and notched to make custom cable traps. |
 |
| See the third nut on the lower bracket? That's there to hold the broken piece of the control housing in place. |

Saturday, September 3, 2016
Sunday, September 6, 2015
Friday, August 14, 2015
Friends with Boats
Our friend Larry took this picture of us as we were both racing to Woody's Warf for a weekend refreshment.


Monday, June 15, 2015
Misc Summer Ramblings
This week I got in a new Scott Outboard key float this one has the motor pictured on the red side. My old one had a broken tab and had the motor on the white side. It's a perfect compliment to the Red/White steering wheel.

We met a new neighbor this weekend with a brand-new old Fiberglassic. This is Matt in his 1959 Glaspar Lido. The yellow and white looks great on this boat and he is proudly running the vintage Johnsen. There's 4-5 of us now in Newport Harbor... time to start a club?

This is a shout out to my friend Bill who runs with a Pirate Crew out of Key Largo, FL. He brought me this flag as a gift. All the members in his social boating club run these on their boats. He said they try to steal each others flags, so I'm going to keep an eye on this one.


We met a new neighbor this weekend with a brand-new old Fiberglassic. This is Matt in his 1959 Glaspar Lido. The yellow and white looks great on this boat and he is proudly running the vintage Johnsen. There's 4-5 of us now in Newport Harbor... time to start a club?

This is a shout out to my friend Bill who runs with a Pirate Crew out of Key Largo, FL. He brought me this flag as a gift. All the members in his social boating club run these on their boats. He said they try to steal each others flags, so I'm going to keep an eye on this one.

Saturday, June 13, 2015
1960 Wilcox Crittenden Stern Lamp
When we bought the boat the original stern lamp was missing. The good news is the Dorsett base was intact.

The Dorsett's were originally fitted a translucent plastic "beehive" lens on the stern lamp. I went on the hunt and found an Ebay seller with some Dorsett parts for sale. I emailed him and asked if he had the stern light and we made a deal and as soon as it arrived I installed it on the boat.

The seller shipped me the lens and pole but there was no socket and bulb so I went to the auto parts store and bought a replacement socket and turn signal bulb. The bulb was super bright and unfortunately super hot. The result was on my first outing, I burned and disfigured the lens. I was able to salvage it but it was burnt on the inside, discolored and mis-shaped.

Since the night I burned-up my lens, I've been emailing folks on Craigslist and Ebay with Dorsett boats/parts for sale. Always asking if anyone has a lens and if so would they sell it to me... with no luck. Well looky what I found on Ebay last week:

Turns out the Dorsett stern lights were made by a company named Wilcox Crittenden and were outfitted on many 50's and 60's era boats. The base of the Ebay find is not a Dorset base but the locknut, stainless steel pole and lamp socket are a perfect match! It has the original socket and small bulb.

This one will get cleaned up and installed for our next sunset cruise!

The Dorsett's were originally fitted a translucent plastic "beehive" lens on the stern lamp. I went on the hunt and found an Ebay seller with some Dorsett parts for sale. I emailed him and asked if he had the stern light and we made a deal and as soon as it arrived I installed it on the boat.

The seller shipped me the lens and pole but there was no socket and bulb so I went to the auto parts store and bought a replacement socket and turn signal bulb. The bulb was super bright and unfortunately super hot. The result was on my first outing, I burned and disfigured the lens. I was able to salvage it but it was burnt on the inside, discolored and mis-shaped.

Since the night I burned-up my lens, I've been emailing folks on Craigslist and Ebay with Dorsett boats/parts for sale. Always asking if anyone has a lens and if so would they sell it to me... with no luck. Well looky what I found on Ebay last week:

Turns out the Dorsett stern lights were made by a company named Wilcox Crittenden and were outfitted on many 50's and 60's era boats. The base of the Ebay find is not a Dorset base but the locknut, stainless steel pole and lamp socket are a perfect match! It has the original socket and small bulb.

This one will get cleaned up and installed for our next sunset cruise!
Monday, June 8, 2015
Vintage Mercury Quick Silver Ride Guide Steering
One of the other issues we sorted out this winter was the steering system. Due to the combination of age and salt water the steering was becoming tougher to operate. In fact one time last summer I put the boat in the water after sitting unused for about 10 days and I could not turn the steering wheel. After a little gentle persuasion and some WD40 on the steering ram tube we were back in business. But it kept getting a little worse ever week. Then finally after sitting the boat for 6 months this winter... the steering was frozen.
This original marine steering system was manufactured by Kiekhaefer Corporation out of Beaver Dam WI. Better known as Mercury, Kiekhaefer manufactured these steering systems designed for dealers to install them into new boats.

My issue was the back of the steering cable where it attaches to the motor. The steering rod was rusted into the steering tube. Trying to salvage the cable proved fruitless. After liberating the cable from the boat I cut the steel tube off but made a critical error and cut through the outer sleeve of the steering cable. I took the cable and had the tube rewelded at the cut but the welding flash was blocking the cable from going past the weld.

Going back to the drawing board I dug out a NOS Quick Silver steering attachment kit I bought off of Ebay. Most of the parts were the same as my setup but the steering tube was a larger diameter than my steering cable so I never used it. So I went in search of a 13' steering cable to match the mounting kit.

I was lucky to find a 13'6" Mercury 76043A13 "Super Ride Guide"cable (dated 11-28-90) from Precision Marine in Rancho Cordova, CA. This cable was a take off and is a heavier cable than my original (with a larger diameter steering rod and tube) but the under dash connection is identical to my Ride Guide steering ram under the dash.

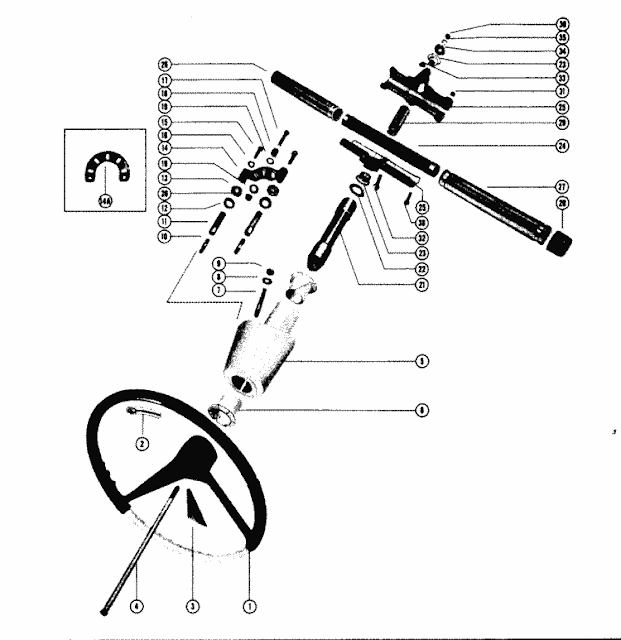 The install was simple bolt in but you do need to completely disassemble the steering ram to install the cable but its a simple R&R and went back together very easy with no special tools. Now my "power steering" is working great!

The dealer who setup our boat matched the Scott Motor Gauges and and Quick Silver steering system into a very nice dash layout. When I was repainting the motor I stripped the gauges and steering wheel and gave them a coat of Wake White to match the motor. Then I added the red lower accent to the steering wheel to match the two tone motor cowl.

The final touch was the OEM Ride Guide emblem from http://www.marineengine.com.


This original marine steering system was manufactured by Kiekhaefer Corporation out of Beaver Dam WI. Better known as Mercury, Kiekhaefer manufactured these steering systems designed for dealers to install them into new boats.

My issue was the back of the steering cable where it attaches to the motor. The steering rod was rusted into the steering tube. Trying to salvage the cable proved fruitless. After liberating the cable from the boat I cut the steel tube off but made a critical error and cut through the outer sleeve of the steering cable. I took the cable and had the tube rewelded at the cut but the welding flash was blocking the cable from going past the weld.

Going back to the drawing board I dug out a NOS Quick Silver steering attachment kit I bought off of Ebay. Most of the parts were the same as my setup but the steering tube was a larger diameter than my steering cable so I never used it. So I went in search of a 13' steering cable to match the mounting kit.

I was lucky to find a 13'6" Mercury 76043A13 "Super Ride Guide"cable (dated 11-28-90) from Precision Marine in Rancho Cordova, CA. This cable was a take off and is a heavier cable than my original (with a larger diameter steering rod and tube) but the under dash connection is identical to my Ride Guide steering ram under the dash.


The dealer who setup our boat matched the Scott Motor Gauges and and Quick Silver steering system into a very nice dash layout. When I was repainting the motor I stripped the gauges and steering wheel and gave them a coat of Wake White to match the motor. Then I added the red lower accent to the steering wheel to match the two tone motor cowl.

The final touch was the OEM Ride Guide emblem from http://www.marineengine.com.

Now I need an upper emblem for the steering wheel. I've seen these where they have Quicksilver and/or Dorsett lettering on the top. I've never seen any for sale so I may need to have it made.

'60 Dorsett Belmont with DORSETT label on the Quicksilver steering wheel.

'60 Dorsett Belmont with QUICKSILVER label on the Quicksilver steering wheel.
Subscribe to:
Posts (Atom)